Voucher-based NFT Minting
The voucher-based NFT minting functionality is currently in beta and has only been tested and deployed on the Goerli testnet.
What Is Voucher Minting
Voucher-based NFT minting (also known as lazy minting or "just-in-time minting") allows for a number of use-cases that enable developers to implement gaming mechanics such as play-to-earn (P2E). The basic idea is that a developer can cryptographically sign off on a voucher containing data for an NFT (e.g. tokenId, price, etc.). The voucher contains all of the data that will go into the final minted NFT, and the digital signature proves the developer/creator authorized the minting of the NFT specified by the voucher. A player can then present this digital signature together with the NFT data to a smart contract in order to mint the NFT.
Vouchers issued to the player are single-use vouchers. This mechanism prevents replay attacks, where a bad actor might use the same voucher to mint multiple items.
When the player calls the redeem function on an ERC-721 or ERC-1155 contract, the signature is validated. If this signature is valid, then the NFT is minted. One of the major advantages of voucher minting is that the gas cost of minting the NFT is paid for by the user calling the redeem function. Generation of these vouchers occur off-chain and costs the developer nothing other than time.
The Voucher Signer Server component can be a standalone service, or it can be integrated into existing backend services of the game. This service must be run by the developer themselves.
For more information on how voucher minting works, you can refer to this NFT School article.
Voucher Minting Flow
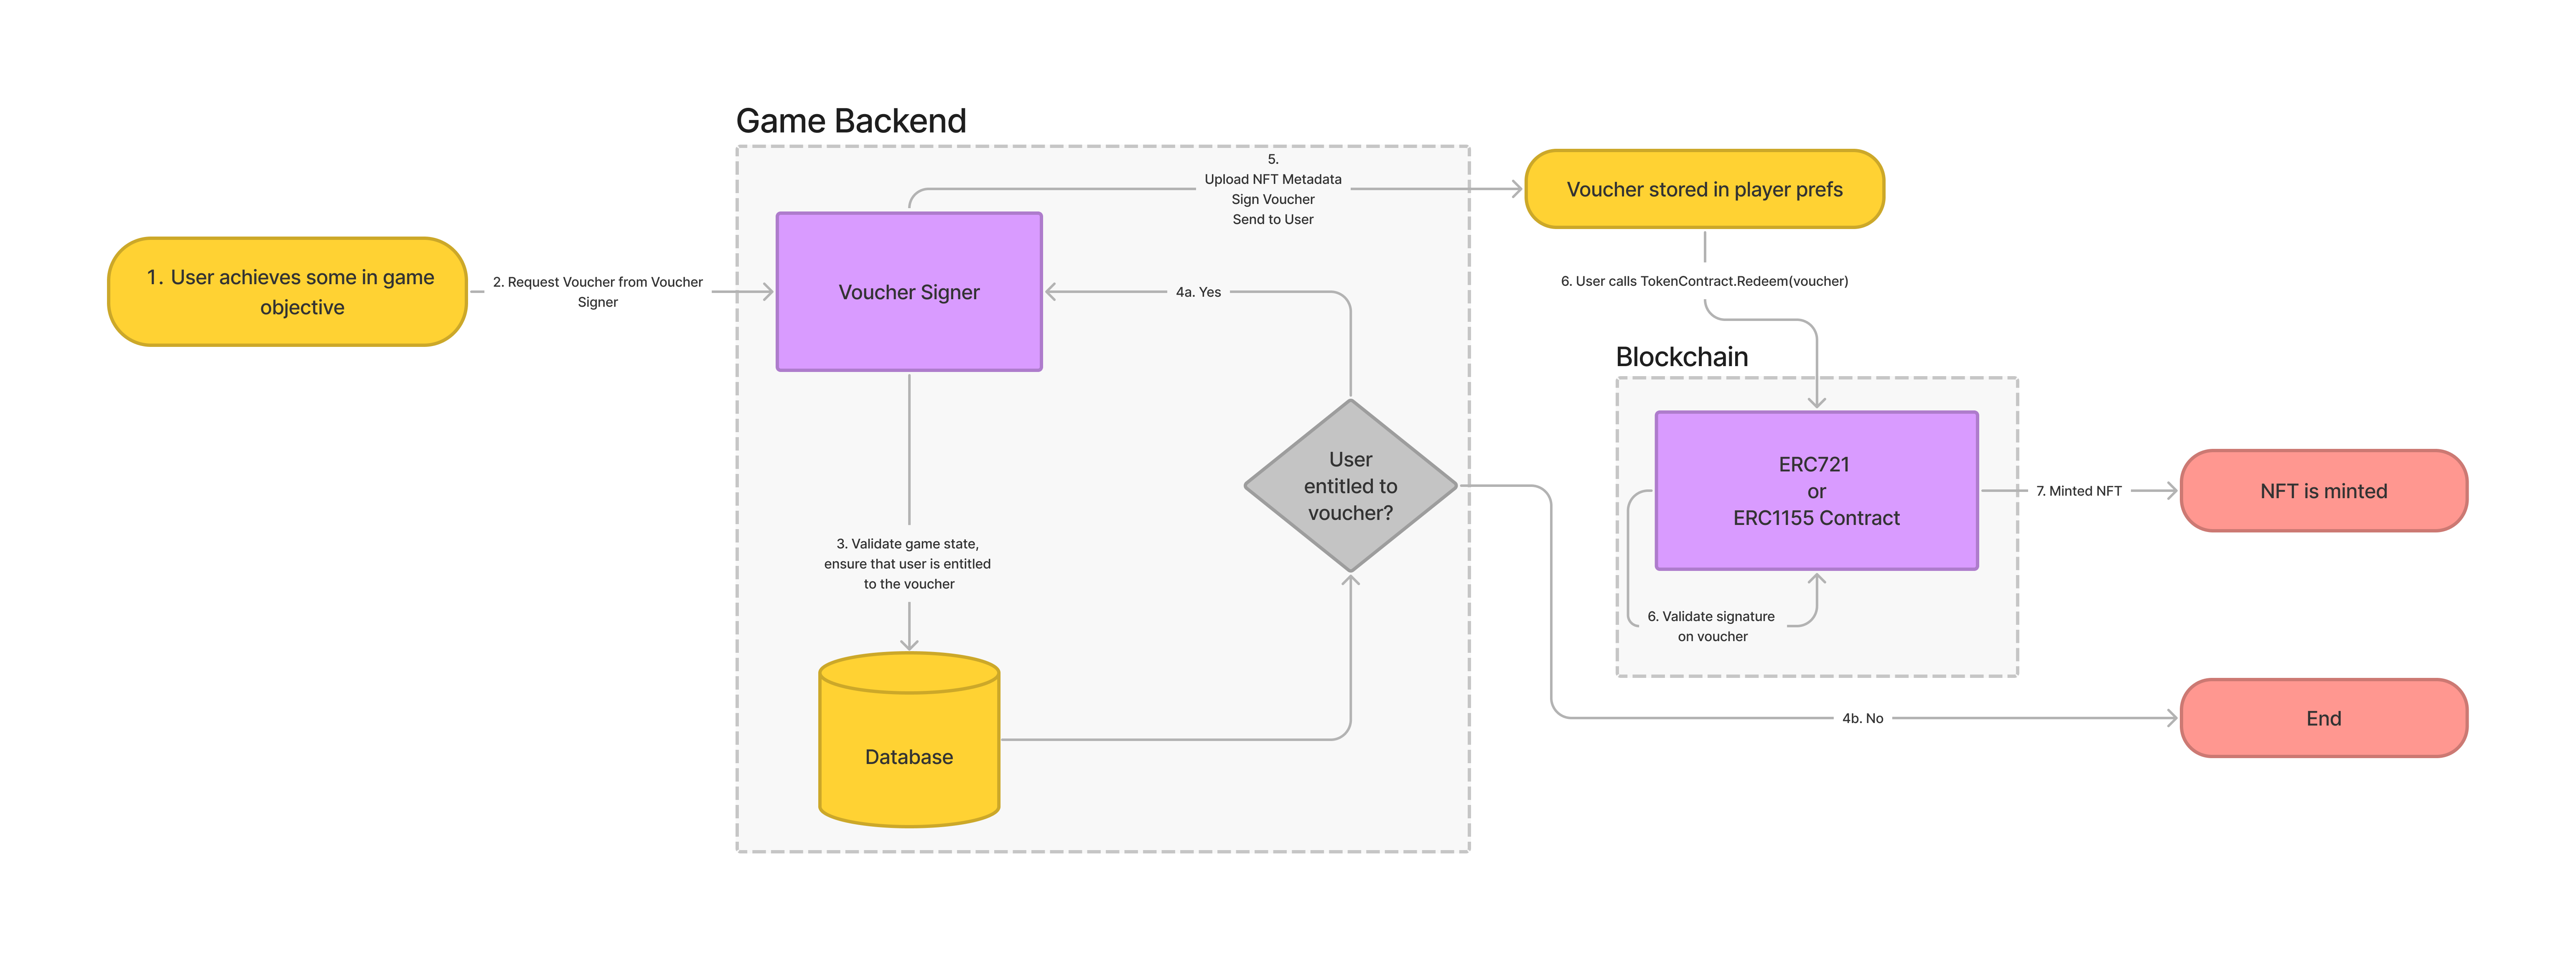
The general flow for voucher minting is as follows:
- A player completes an in-game action (e.g. wins a battle in the game) earning themselves the right to mint an NFT.
- The game makes a request to the
Voucher Signer Serverfor a voucher (providing any information required for the Signer to validate that the user did complete the task required). - The
Voucher Signer Serverwill validate that the conditions for the issuing of this NFT were indeed met (e.g. check against the game's internal database that the player with a specific address won a battle). - Once the above check has passed, the
Voucher Signer Serverwill prepare the metadata of the NFT to be minted, and upload this to IPFS. This step will result in a unique CID linking the token (to be minted) and the CID together. - The
Voucher Signer Servergenerates a message which includes the CID of the NFT (to be minted) and signs this using theVoucher Signer Serverprivate key. This signature and the data about the NFT to be minted are sent back to the game, and stored in thePlayerPrefs. - A player will then redeem the voucher that is now in their possession, by calling the ERC-721 or ERC-1155 contract
Redeem(...)function (using the Unity SDK) passing in the voucher received in step 5. The signature and all NFT data is validated by the respective token contract, the NFT is minted, and then transferred to the player.
Lazy Minting Signer
The sample code provided here shows a NodeJS (Express server) implementation of a voucher signer, with no validation of whether the conditions for issuing a voucher have been met.
This example implements methods for both ERC-721 and ERC-1155 vouchers, though you will likely only use one of these in your application. These are both included for demo purposes.
Prerequisites:
- An API key for ChainSafe Storage (https://app.storage.chainsafe.io/api-keys) - this is required for the
Voucher Signer Serverto upload the metadata to IPFS using ChainSafe Storage. - A signer private key/mnemonic. This can be generated here, or extracted from a wallet such as MetaMask. This account does not need to have any funds on any network, as the key is just used to cryptographically sign the voucher (no gas is required for this).
- NodeJS 16+
Generate An ERC-721 Voucher
- Validate whether the user is entitled to mint the NFT (this has been hard-coded to be true in the example server). In real-world cases, the game state would be queried to ensure that the user requesting the voucher is indeed entitled to receive it.
// Query game state to determine whether the user making the request is authorized to mint const const voucherEarned = true
if (!voucherEarned) { throw new Error("Voucher is not yet earned"); }
- Generate metadata for the NFT and upload to ChainSafe Storage or another IPFS host of your choice. You will now have the CID of the metadata.
const metadata = {
    name: "test lazy mint ERC721 nft",
    description: "ipsum lorem",
    image
}
const axiosClient = axios.create({ transformResponse: [] })
const apiClient = new FilesApiClient({}, storageApiUrl, axiosClient)
apiClient.setToken(storageApiKey)

try {
  const uploadResult = await apiClient.uploadNFT(metadata, "blake2b-208")
} catch e {
  console.error(e)
}
uploadResult is the CID of the metadata for which the voucher will now be signed.
- Generate an EIP712 TypedData signed message using the LazyMinter utility. Please note that the
tokenIdthat is passed needs to be formatted correctly using thecidToTokenId()helper provided.
const provider = getDefaultProvider(5) // Goerli
const wallet = (recoverWalletFromMnemonic(signerMnemonic)).connect(provider)
const minterContract = GeneralERC721__factory.connect(minter721Address, wallet)
const minter = new LazyMinter({ contract: minterContract, signer: wallet })
const voucher = await minter.createVoucher721({
      minPrice: 0,
      tokenId: cidToTokenId(uploadResult.cid),
      signer: wallet.address,
      receiver
})
- Return the voucher and signature to the user.
res.send(voucher)
Generate An ERC-1155 Voucher
- Validate whether user is entitled to mint the NFT (this has been hard-coded to be true in the example server). In real-world cases, the game state would be queried to ensure that the user requesting the voucher is indeed entitled to receive it.
// Query game state to determine whether the user making the request is authorized to mint const const voucherEarned = true
if (!voucherEarned) { throw new Error("Voucher is not yet earned"); }
- Generate metadata for the NFT and upload to ChainSafe storage (IPFS). You will now have the CID of the metadata which is necessary for minting the token. When uploading metadata to be used for an ERC-1155, the hashing algorithm used should be set to
blake2b-208to ensure that the resulting CID can be used as atokenId.
const metadata = {
  name: `test lazy mint ERC1155 nft`,
  description: `ipsum lorem`,
  image,
}

const axiosClient = axios.create({ transformResponse: [] })
const apiClient = new FilesApiClient({}, storageApiUrl, axiosClient)
apiClient.setToken(storageApiKey)

try {
  const uploadResult = await apiClient.uploadNFT(metadata, "blake2b-208")
} catch e {
  console.error(e)
}
uploadResult is the CID of the metadata for which the voucher will now be signed.\
\
3. Generate an EIP712 TypedData signed message using the LazyMinter utility.
const provider = getDefaultProvider(5)
const wallet = (recoverWalletFromMnemonic(signerMnemonic)).connect(provider)
const minterContract = GeneralERC1155__factory.connect(minter1155Address, wallet)
const minter = new LazyMinter({ contract: minterContract, signer: wallet })

const voucher = await minter.createVoucher1155({
      minPrice: 0,
      tokenId: cidToTokenId(uploadResult.cid),
      amount: 1,
      nonce: dayjs().valueOf(),
      signer: wallet.address,
      receiver
})
The nonce can be set to any random value. In this case, the timestamp of the request is used.\
\
Please note that the tokenId that is passed needs to be formatted correctly using the cidToTokenId() helper provided.
const provider = getDefaultProvider(5)
const wallet = (recoverWalletFromMnemonic(signerMnemonic)).connect(provider)
const minterContract = GeneralERC1155__factory.connect(minter1155Address, wallet)
const minter = new LazyMinter({ contract: minterContract, signer: wallet })

const voucher = await minter.createGamingVoucher1155({
  minPrice: 0,
  tokenId: cidToTokenId(uploadResult.cid),
  amount: 1,
  nonce: dayjs().valueOf(),
  signer: wallet.address
})
- Return the voucher and signature to the user
res.send(voucher)
Using A Voucher To Mint In Unity
Once the voucher has been issued to the user, this can be presented to the redeem function on the ERC-721/ERC-1155 contract (as shown below) in Unity and used to mint. These prefab examples are located in Web3Unity -> Prefabs/Scripts -> Minter -> WebGL/WebWallet -> VoucherMint.
using System;
using Models;
using Web3Unity.Scripts.Library.ETHEREUEM.Connect;
using UnityEngine;

#if UNITY_WEBGL
public class VoucherMintMenu : MonoBehaviour
{
    // set chain: ethereum, moonbeam, polygon etc
    public string chain = "ethereum";
    // set network mainnet, testnet
    public string network = "goerli";
    // address of nft you want to mint
    public string nftAddress = "0x2c1867bc3026178a47a677513746dcc6822a137a";
    // type
    string type = "1155";

    public async void VoucherMintNFT()
    {
        try
        {
        var voucherResponse1155 = await EVM.Get1155Voucher();
        CreateRedeemVoucherModel.CreateVoucher1155 voucher1155 = new CreateRedeemVoucherModel.CreateVoucher1155();
        voucher1155.tokenId = voucherResponse1155.tokenId;
        voucher1155.minPrice = voucherResponse1155.minPrice;
        voucher1155.signer = voucherResponse1155.signer;
        voucher1155.receiver = voucherResponse1155.receiver;
        voucher1155.amount = voucherResponse1155.amount;
        voucher1155.nonce = voucherResponse1155.nonce;
        voucher1155.signature = voucherResponse1155.signature;
        string voucherArgs = JsonUtility.ToJson(voucher1155);

        // connects to user's browser wallet to call a transaction
        RedeemVoucherTxModel.Response voucherResponse = await EVM.CreateRedeemTransaction(chain, network, voucherArgs, type, nftAddress, voucherResponse1155.receiver);
        string response = await Web3GL.SendTransactionData(voucherResponse.tx.to, voucherResponse.tx.value.ToString(), voucherResponse.tx.gasPrice, voucherResponse.tx.gasLimit, voucherResponse.tx.data);
        print("Response: " + response);
        }
        catch (Exception e)
        {
            Debug.LogException(e, this);
        }
    }
}
#endif
Disclaimer
The contracts have been internally audited by ChainSafe and usage is subject to the ToS.