Getting Started
Install the Web3.Unity SDK via Unity Package Manager
On the top bar in unity, navigate to Window → Package Manager → Press the plus button on the top left → Add via Git URL.
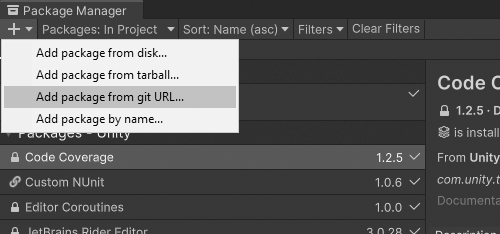
Our packages are modular so your project wont bloat out with SDK files and you can have a lean development environment. The first piece you will need to begin your development journey is the core SDK package. This package contains everything you need for standard chain interactions. Simply enter this url into the add path field of the package manager.
Packages
Core SDK
https://github.com/ChainSafe/web3.unity.git?path=/Packages/io.chainsafe.web3-unity
If you prefer to download packages trough openUPM you can do it trough the following link:
https://openupm.com/packages/io.chainsafe.web3-unity/?subPage=readme
Extensions
Other modules that depend on the core SDK and can be downloaded through git or openUPM:
Web3Auth Login Provider
https://github.com/ChainSafe/web3.unity.git?path=/Packages/io.chainsafe.web3-unity.web3auth
Hyperplay Login Provider
https://github.com/ChainSafe/web3.unity.git?path=/Packages/io.chainsafe.web3-unity.hyperplay
Lootboxes
https://github.com/ChainSafe/web3.unity.git?path=/Packages/io.chainsafe.web3-unity.lootboxes
Marketplace
https://github.com/ChainSafe/web3.unity.git?path=/Packages/io.chainsafe.web3-unity.marketplace
MUD
https://github.com/ChainSafe/web3.unity.git?path=/Packages/io.chainsafe.web3-unity.mud
Fiat On/Off Ramp support
https://github.com/ChainSafe/web3.unity.git?path=/Packages/io.chainsafe.web3-unity.ramp
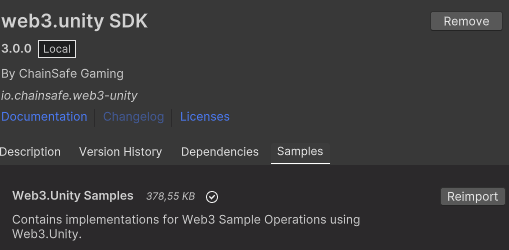
Each package has samples that can be installed, these samples are built to give you a working example on the packages calls. You will also need the CORE SDK samples package if you want to work with the sample scripts seen here
Updating via The Package Manager
Go to window → package manager → select the web3.unity SDK package and press update. The same can be done for any additional packages you have installed, web3auth, lootboxes etc.
ChainSafe Server Settings
Set Chain
To make the SDK work, You need to set up the list of chains you want to interact with inside of your project:
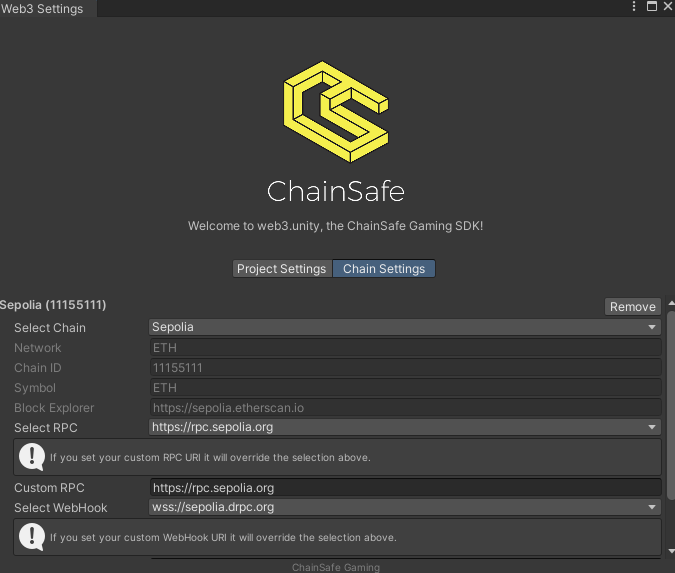
You need a minimum of 1 chain for the SDK to work normally.
All of our samples are made on the Ethereum Sepolia network. If you run the samples whilst you are on another chain, you will get an exception.
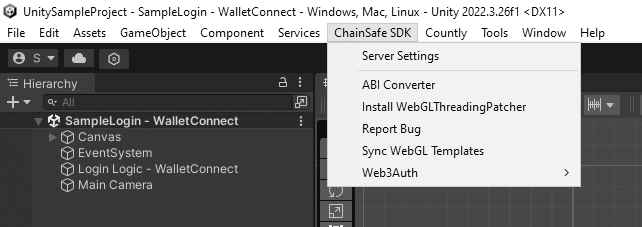
Accessing Server Settings
If you need to refer to the ChainSafe server settings area again, you can find it on the top navigation bar. Simply select it and press server settings to view the menu.
Add a Web3 Client object to your scene
Just drag and drop the Web3Unity from Packages/io.chainsafe.web3-unity/Runtime/Prefabs/Web3Unity.prefab to the scene and you should be good to go!
Now after you've done this, you need to choose your wallet provider.